The day The Bread Baker's Apprentice cookbook arrived was the day I discovered pugliese bread and a hint to my ancestral roots. I was not a newcomer to bread baking, but I wanted to learn more, to understand the artisanal bread movement and to learn its techniques. Peter Reinhart, the author of the bread book, is considered a master baker and teacher , so I bought his book.
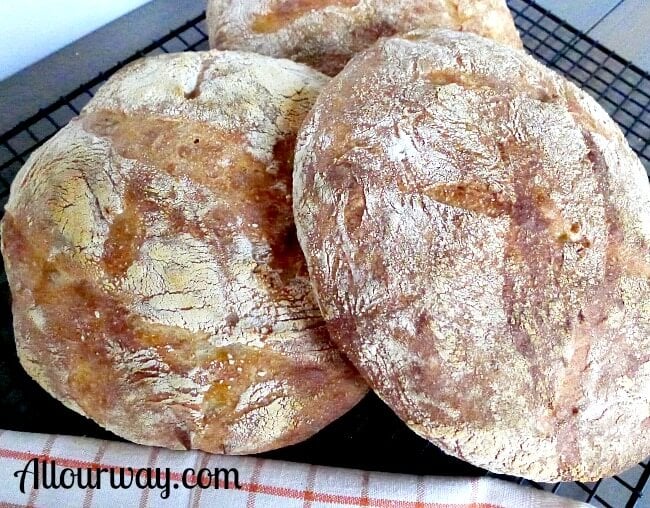
Finding the Pugliese bread recipe
How exciting to learn all about bread baking.
I was going to learn about formulas and percentages, starters, the difference between winter and spring wheat, why master bakers use instant yeast instead of active dry or compressed.
Peter Reinhart was the teacher and I was the apprentice. He would teach me what seasoned bakers took years to learn.

The approach was going to be methodical -- I was going to start at page one and go through each lesson and bake the bread represented in the chapter. I opened to the table of contents and what jumped out at me?
Pugliese Bread !
Now you're probably scratching your head wondering why I should have a bold/italic reaction to Pugliese bread?
The fact is that Pugliese is my maiden name. All I could think of was making Pugliese bread and sharing it and the fact that there was a bread named after us with my family.
Out went my plans to be methodical and take each lesson in order.

The rustic bread history
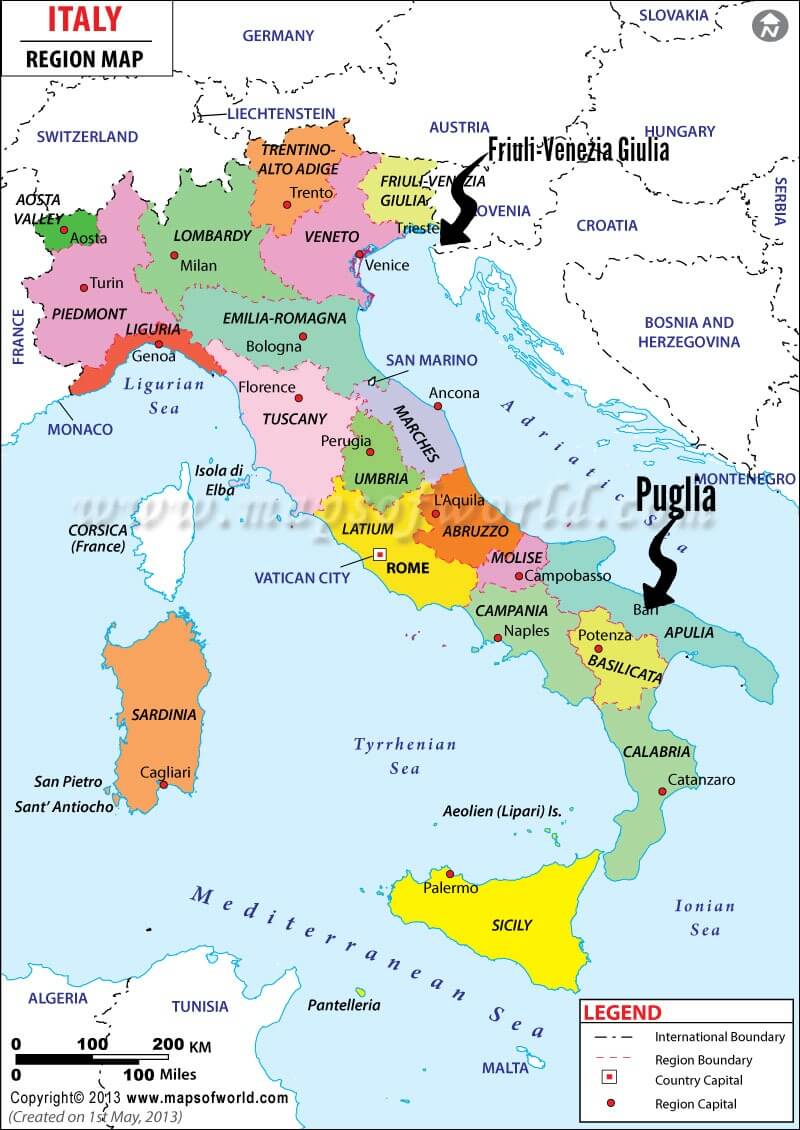
I jumped to page 222 and began to read. As I read, it began to dawn on me that the surname Pugliese referred to the Puglia {Apulia in English} region in Italy which is in the southeastern part of the country.
Well, I was born in the northeastern region of Friuli-Venezia Giulia and as far as I knew all of my grandparents were from the north. But, somewhere along the line the ancestors on my papa's side must have migrated to the north.
The mysterious background
Once I made the loaves of bread, I hurried over to my parent's house
carting the bread and cookbook with me. I not only wanted them to sample the bread but I also wanted them to see for themselves that a Pugliese bread existed. I was curious about our last name being linked to Puglia so I asked about our ancestral origins .
Unfortunately, neither mamma nor papa knew anything because both sets of parents died when they were very, very young.
All I know about the nonni ( grandparents ) is that they were contadini (farmers).
The technique for the rustic bread
I've made Pugliese bread countless times throughout the years. It's a lot like ciabatta-- it's a very wet dough --and the technique for preparing it is similar.
The biga start
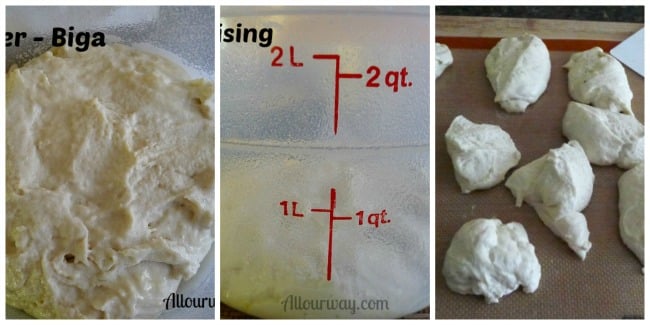
Pugliese bread begins with a biga which is a pre-ferment. A food processor works great when making this - zip! zip! zip! and you're done.
The dough ferments in the bowl for 2 to 4 hours and then the biga is removed from the bowl, gently kneaded to degas it and then placed back into the bowl and refrigerated overnight.
Starting the process
The next day, take the dough out of the refrigerator one hour before making the bread and cut the biga into 10 pieces.
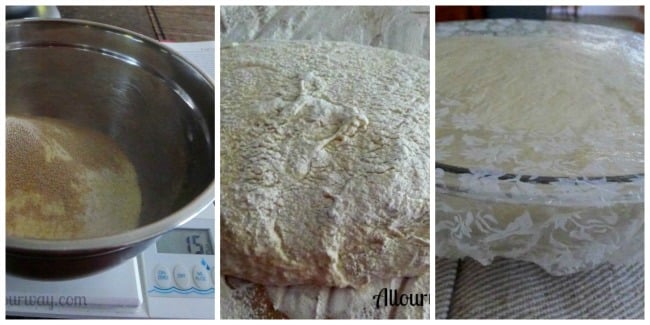
I weigh out the unbleached bread flour and fancy durum flour then add the salt and yeast. It's good to whisk the dry ingredients together before putting them into a large mixing along with the biga, mashed potatoes, and the water.
The dough is very sticky so you need a lot of extra flour. Here you follow the same procedure as the tutorial for making ciabatta.
After the dough goes through the stretch and fold method it goes into a bowl to ferment some more.
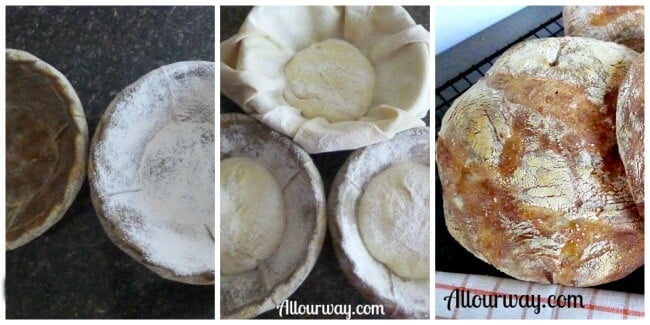
One distinction between Pugliese and ciabatta is that Pugliese is formed in a round loaf rather than the slipper shape of ciabatta.
The baskets are first sprayed with vegetable spray and then dusted heavily with flour.
Forming the loaves
I transferred the dough to the cutting board and then I gently cut the dough into three pieces being careful not to degas the dough too much. I make each piece of dough into a boule -- a tight ball.
You can do this by stretching and smoothing the dough from top to bottom and pinching the bottom. The smooth part of the ball is put down and the pinched side up.
Baking the Pugliese bread
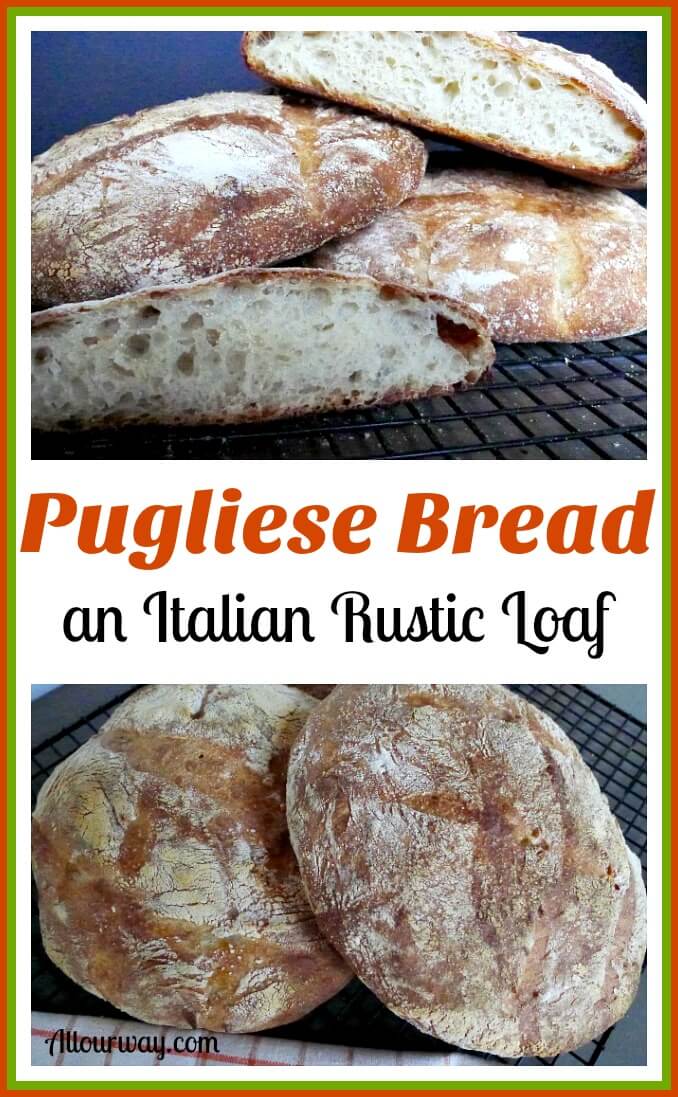
The bread starts off in a 500°F oven and then finished in a 450° F oven -- until the Pugliese bread is a deep golden brown and the inside registers about 205°F.
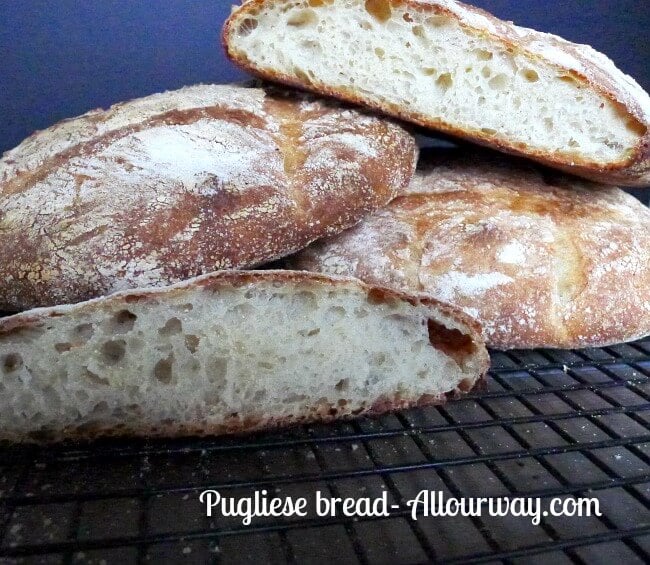
Another distinction between this bread and ciabatta is that this bread uses fancy durum flour and sometimes a few mashed potatoes.
The starch in the potato adds a nice flavor and tenderizes the bread. Pugliese bread has a wonderful open crumb, and the long fermentation enhances the bread's flavor.
Another bread with the name Pugliese you may like to try is Focaccia Pugliese.
If you simply can't resist stopping by a French bakery for their marvelous loaves of bread, make this 4-hour Crusty French Bread recipe at home. Everyone will think you bought it.
Be sure to sign up for our weekly newsletter to see what we are cooking and baking. We love to share.
Tutti a tavola è pronto!
Un caro saluto e alla prossima.
YOU MAY NEED...
The following are affiliate links. We are a participant in the Amazon Services LLC Associates Program, an affiliate advertising program designed to provide a means for us to earn fees by linking to Amazon.com and affiliated sited.
We use a Banneton Proofing Basket like this every time we make a round loaf. Whether it's a rustic bread like this Pugliese bread or a our dough bread, the basket makes it easy to keep the beautiful shape.
What's new here? Check out my All Our Way Store on Amazon. We'll be adding more items we love and use or wish we had to make cooking fun and easy.
Thank you for being a part of All Our Way.
Pugliese Bread - An Italian Rustic Loaf Recipe
📖 Recipe
Pugliese Bread - An Italian Rustic Loaf
Equipment Needed
Ingredients
Biga
- 2 ½ cups unbleached bread flour (11.25 ounces)
- ½ teaspoon instant yeast (.055 ounce)
- ¾ cup plus 2 Tablespoons to 1 cup water, room temperatures (7 to 8 ounces)
For the Pugliese Bread Dough
- 18 oz. Biga This is all of the biga you made.
- 1 ¼ cups fancy durum flour (7 ½ ounces)
- 1 ½ cups unbleached bread flour (7 ½ ounces)
- 2 ¼ teaspoons salt (¼ ounce or 10 grams)
- 1 ½ teaspoon instant yeast (¼ ounce or 5 grams)
- ⅓ cup mashed potatoes (3 ounces)
- 1 ⅔ cup lukewarm water (12 to 13 ½ ounces or 340 ¼ to 382 ¾ grams)
Instructions
- Biga - Day 1
- Stir together the flour and yeast in the food processor bowl using the metal blade. Add all of the ¾ cup plus 2 tablespoons of the water through the feed tube. Pulse until the dough comes together and is neither too sticky nor too stiff. Continue to pulse until the dough is soft and pliable. This does not take very long.
- Lightly oil a bowl with vegetable spray and transfer the dough to the bowl making sure that the entire surface of the dough is coated with oil. Cover the dough with plastic wrap (or shower cap) and ferment at room temperature for 2 to 4 hours -- or until nearly double in size.
- Remove the dough from the bowl, knead it lightly to degas, and return to the bowl, covering the bowl with the plastic wrap. Place the bowl in the refrigerator overnight. You can keep this for up to 3 days.
Bread Baking Day
- Remove the biga from the refrigerator 1 hour before making the dough. Cut it into about 10 small pieces with a pastry scraper or a serrated knife. Spray the dough with vegetable spray and cover with plastic wrap and let sit for 1 hour to take off the chill.
- Whisk together the flour, salt, and yeast in the bowl of a stand mixer. Add the biga pieces, mashed potatoes, and 12 to 13 ½ oz. (1 ⅔ cup) water. Measure all of the water out but leave a Tablespoon or 2 in the measuring cup. Using the paddle attachment mix on low speed until the ingredients form a wet, sticky ball. If there is still some loose flour add the rest of the water in the measuring cup and continue to mix.
- Switch to the dough hook and mix on medium speed for 4 to 5 minutes, or for as long as it takes to create a smooth, sticky dough. The dough will clear the sides of the bowl but it will stick to the bottom. The dough will be sticky -- the wetter it is, the better the final bread will be.
- Sprinkle bread flour on the counter to make a bed.Using a scraper or spatula dipped in water, transfer the dough to the bed of flour and proceed with the stretch-and-fold method. This method entails (A) dusting the top of the dough liberally with flour, patting the dough into a rectangle. Wait 2 minutes for the dough to relax. Coat your hands with flour and (B) lift the dough from each end, stretching it to twice its size. (C) Fold the dough over itself, letter style to return to a rectangular shape. Mist the top of the dough with spray oil, again dust with flour, and loosely cover with plastic wrap.
- Let it rest for 30 minutes. Repeat the stretch-and-fold method and again mist with spray oil, dust with flour, and cover. (Each time you repeat this process, the dough will become stronger, more elastic, and less sticky.)
- Lightly oil a large mixing bowl. For the third time, repeat the stretch-and-fold technique. Transfer the dough to the bowl and cover the bowl with plastic wrap. Ferment the dough at room temperature for 2 hours.
- Generously dust the counter with flour and transfer the dough to the counter, taking care not to degas the dough. With a metal pastry scraper or a serrated knife dusted with flour, divide the dough into 3 pieces.With floured hands, gently shape the dough pieces into 3 boules (balls). You do this by creating surface tension as you bring the opposite ends together to make a ball. Keep smoothing down the sides from top to bottom. Pinch to seal the bottom of the dough where the creases come together. Let them relax seam-side down on the counter while you prepare the 3 proofing bowls.
- Coat the proofing bowl with spray oil and then line the bowl with a cloth napkin, or smooth towel. Spray the cloth with spray oil and dust with flour. (I have muslin-lined bannetons and for the third bowl I used a pastry cloth with a regular glass bowl) Gently transfer the dough, seam side up, into each bowls. If the seam opens up, pinch it closed. Mist the top of the dough with spray oil and cover the bowls with the flaps of the cloth or a smooth dish towel.
- Proof at room temperature for 60 to 90 minutes, or until the dough has expanded to about 1 ½ times its original size.
- Preheat the oven to 500 F. Have a water spray bottle ready.
- Generously dust the back of a sheet pan with semolina flour or cornmeal. Spray a sheet of kitchen parchment with spray oil and put the parchment -- oiled side up -- on the sheet pan. Gently transfer the dough to the pan by carefully turning each bowl over onto the pan, lifting off the bowl, and then carefully peeling off the cloth. The dough will spread out on the pan. With a sharp razor blade or french lame, score the loaves with the pound (#) sign. Transfer the dough to the baking stone (or bake on the pan). After 30 seconds, spray the oven walls with water and close the door again. Be careful you don't spray the light!!!! Repeat twice more at 30-second intervals. After the last time lower the oven setting to 450 F and bake for 15 minutes. Check the loaves and rotate 180 degrees for even baking. Continue baking for 10 to 15 minutes or until the breads are a deep golden brown and the internal temperature registers 205 F.
- Remove the loaves from the oven and transfer them to a cooling rack. Allow the loaves to cool for at least 40 minutes. This will be sheer torture!
Notes
- Although there seems to be a lot of steps this is not a difficult recipe to make. It is a wet dough-- keep your counter well dusted with flour as well as your hands.
- You can make this bread by hand.
- This recipe is adapted from the Peter Reinhart's "The Bread Baker's Apprentice"
- Baker’s Percentage Formula for Pugliese bread:
Biga –105%
Fancy durum flour — 100%
Salt — 3.8%
Instant yeast — 1.1%
Mashed Potatoes — 20%
Water (approx.)– 85%
———————–
Total 314.9%
Nutrition
Sign up for the emails and never miss another recipe!!
We'll never share your email or send you spam. PromiseNote: Recipes and content from All Our Way©2014 is copyright protected. Please do not use content or recipe without prior written permission. If you want to share the information, please link to this post. Thank you.




Joseph
hello again can I use 00 bread flour imported from Italy ?? The brand is Caputo
Marisa Franca
Hello Joseph! We are huge fans of Caputo Flour - yes you may use it for the bread. Happy baking!
Nathan Thompson
Hello Marisa, thank you for this amazing recipe. It turned out amazing!
What would the flour quantities be if you were to leave out the mashed potatoes?
Marisa Franca
Thank you, Nathan, I'm glad you enjoyed the bread. I've never made the Pugliese bread without the mashed potatoes so I really couldn't advise you on it. The mashed potatoes add to the moisture and texture of the bread. If you decide to make it another way, it would be more like a Tuscan bread. Happy baking!
Paul Del Zio
Hi Marisa, came across your bread from the “Puglie” , never made it only the priest’s hat version which I think is Altamura or thereabouts .
Interestingly my paternal grandparents are from Bari and went up north to Trieste in the early 1900’s where my father and I were born . My father migrated to Sydney Australia in the early 50’s , and so here I am.
I’m well versed in baking ciabatta , baguettes and Pinza Triestina a sweet brioche style bread baked at Easter plus other pastries particular to the area so I’m looking forward in making this version of the Pugliese . I will let you know of my result, till then , take care ,
Kind regards, Paul
Marisa Franca
Ciao Paul! I'm so happy you came across the recipe. Interestingly enough we had some distant relatives move to Australia. I believe at the time there were 3 possibilities for the people in our area. It was the US, Canada, or Australia. Our sponsors were from the US. I'm anxious to know how your bread turns out -- fammi sapere! Alla prossima, Marisa
Judith
I checked King Arthur flour and they only have durum flour on clearance Fancy durum is different?
Marisa Franca
Hi, Judith! As long as it is finely ground and NOT semolina flour you should be okay. xoxo.
Mitchell Crumley
Beautiful bread.
I decided not to cook it in the oven but in my Tr*ager brand pellet smoker. I heated the pellet grill up to 500, then dropped it to 450 for the longer bake. I put a small cast iron pan in the smoker to add a bit of water/steam during the first 15 minutes of the bake.
Wood fired baking adds an amazing dimension to an already fantastic bread.
Thanks for publishing your voyage!
Ciao
Marisa Franca
Grazie, Mitchell for sharing your baking experience. Hubby would love to have a smoker. He said if we were any younger he'd have one. I bet the bread was delicious!! Have a wonderful day.
NG
Hi! I found pugliese bread in nyc and now i am trying to make it at home, this recipe looks great!
a couple of questions:
1-can i use potato flakes instead of mashed? and what weight/amount conversions do i need to do so?
2-do you have the recipe in weight or bakers %? i have been trying to stay consistent and using these #S
TY!
NG
Marisa Franca
Ciao, Nathan! You've picked a challenging bread and one of my favorites! My maiden name is Pugliese.
Sure you can use potato flakes. The mashed potatoes are optional. The great part about the mashed potatoes is that is adds a nice flavor and tenderizes the bread because of the potato starch. If you do use it, you may have to increase with a bit of additional flour to compensate for the added moisture. What is important is to use mashed potatoes that are seasoned with salt. You know, like leftover mashed potatoes from a meal.
The recipe on the blog was transferred from another recipe card I was using. I'll rework it so that you can see the weights a bit more clearly. They are there but they don't come through like they should.
Baker's Percentage Formula for Pugliese bread:
Biga --105%
Fancy durum flour -- 100%
Salt -- 3.8%
Instant yeast -- 1.1%
Mashed Potatoes -- 20%
Water (approx.)-- 85%
-----------------------
Total 314.9%
If you don't have fancy durum flour, you can substitute semolina flour, but use only 1/3 as much as the formula calls for and replace the rest with an equal amount of with either unbleached high-gluten or bread flour.
Also, the amount of water in the final dough will be determined by the particular type and brand of flour you use. Durum flour tends to absorb more water than bread flour. Use the amount listed as a guideline and starting point.
If you have any questions please ask -- I love to bake bread and have made this many times.
Tammy Rockwell
I made a rather large batch of biga using a recipe in Carol Field's book and I have some left over. Can you tell me by weight how much biga this recipe takes so I can use what I have without making a fresh batch.
Marisa Franca
The recipe is for an 18 oz.biga. If you have more like 10.8oz. use 10 oz. of flour in combination. I like a 50-50combo of the durum flour and unbleached bread flour. Then use 1 1/2 tsp. salt, 1 tsp instant yeast, 1/4 cup (2 oz.) mashed potatoes and 1 to 1 1/8 (8 to 9 oz.)lukewarm water I hope this helps. Let me know how it goes. I'll be going back and adding the weight measurements to my recipes -- that's all we use is weight.
Ellen
I am always happy when I find recipes from the Puglia region of Italy. My maternal grandmother was from Foggia and I long to travel there. Until then I'll pin this recipe and hope to make it soon.
Marisa Franca
Hello, Ellen! I so glad you found the recipe. It is excellent and if you're looking for more Puglia recipes I do have a Pugliese Focaccia. It is excellent. Let me know how you like it. I will be posting more recipes from the Puglia area (my maiden name is Pugliese).
Ray Duclos
I would give you a 5th star if the Pugilese aroma had been there. The crust and the crumb were excellent and my wife loved it. She said it was the best bread I have made. ?? I have been baking lots of things since I retired but now at 83 I am slowing down some, but still looking for bread challenges. I still look for the real arome Pugilese should have. Any thoughts from you on that?
PS. I am of French Canadian decent, may be my problem?
Marisa Franca
Hummm! French,huh?? Well, let me see if I can work for that last star. It smells a little bit of heaven with a touch of butter. An underlying nutty aroma that is sublime. It fills the senses with comfort and glee. How's that? Well, Ray! I'm so glad you sent us your comment -- I'm a little younger than you but not much. And as you saw on the post -- I'm 100% Italian. So, you want a challenge? How about our Stud Muffin bread! (Not named after my Hubby although he claims it is) It"s fantastic with three different cheese plus gruyere -- that's the French in it. We didn't want to be selfish and just have it be Italian. ???? Also, another bread you and your wife may enjoy is the ciabatta or the Herb Tomato Swirl bread. It has a great presentation -- and the taste is fantastic. Let me know if you want me to describe any more bread. And let me in on your baking adventures. Merry Christmas and a Happy New Year to you and your wife.
Madi
I have to give this bread a try! It sounds so incredible!
Chrisy
Love recipes with a history 😉 Can't wait to try making this at home!
Marisa Franca
It is delicious, Chrisy! You won't be disappointed. Merry Christmas!
Citra Kale
Bread is staple in my house. İ also make bread almost everyday and İ am so happy..too happy find your recipe. İ think İ found once something like your biga here in my local bread maker.. İ should ask more..or İ must make my own biga... pinned your recipe . thank you Marissa.
Marisa Franca
Making your own biga gives the bread a start in the flavor. Thank you for pinning.
Mark Hogue
Could someone please tell me if there is supposed to be a thirty minute rest after the second stretch and fold? Step six does not say to wait.
I love the books! This recipe seems to be the same as in The Bread Baker's Apprentice.
Thanks!
Marisa Franca
Hi, Mark! The bread goes immediately into the bowl after the 3rd stretch and fold and there is a 30-minute wait after the 2nd. And yes my Pugliese bread is from The Bread Baker's Apprentice -- I tell that in my story. My maiden name is Pugliese. Let me know how it turns out.
Mark Hogue
It turned out great. At the third stretch and fold, there were a lot of bubbles, but it all worked out okay.
Marisa Franca
Hi, Mark!! I'm so glad it turned out!! I love working with the soft doughs and it's always a challenge to see how it turns out. I get so excited to see the holes. You're going to have to do the ciabatta bread. That's a real wet dough too but it is so good. Thank you for getting back to me and letting me know how you did. I'm planning to do a lot with sourdough. Are you interested? Happy bread baking.
Karyn
Omg Puglio looks amazing and so beautiful as does your bread. Baking bread has always been my nemisis but this recipe looks so easy!!!
Marisa Franca
Hi, Karyn! You've got to try it -- you'll love the experience and especially the eating. If you have any questions, I'll try to answer.
Anvita
I have been wanting to make homemade bread for a while but I never get around it. This one looks easy. I would love to give it a shot
Marisa Franca
Hi, Anvita! The bread is so good you'll want to make it again and again.
Ashley - Forking Up
I visited Italy a year ago and looooved it. This loaf brings me back!
Marisa Franca
They do have fantastic food, don't they Asley?
Molly Kumar
OMG, the bread look soooo good!!! I love the crust and it looks perfect. I've actually never used bread flour but I think I'll have to get one soon and try this.
Marisa Franca
Hi, Molly! The bread flour really gives the bread that great chew. Try it next time.
Kylee from Kylee Cooks
I just love reading your stories and backgrounds for recipes. This bread looks delicious. I accept deliveries.....!
Marisa Franca
Thank you. I would love to send you some bread, Kylee! I love to bake and Hubby and I are watching our weight.
Christine - Jar Of Lemons
YUM! Being Latina, bread has always been a staple and something I crave. I love this Pugliese recipe and hope to try it soon!
Marisa Franca
It's a great recipe, Christine. The aroma is amazing.
Veena Azmanov
Oh Italy... the food - the place.. the people. Love everything Italian. I use to have a neighbor in Singapore who was Italian and she'd bake some really amazing breads! Never could pronounce the names but.. wow were they delicious!! This looks so good.
Marisa Franca
Hi, Veena! Itay does have some great food. I love the simple ingredients they use and whatever they make turns out amazing -- like your cakes.
Adriana Lopez Martn
I absolutely love Italy, visited last year and I have a blast. The food is just amazing. And this bread you are presenting today it is just breathtaking I wish I could have a slice. Thanks for educating us on Puglia.
Marisa Franca
Hi, Adriana! Thank you. I hope to one day visit the Puglia area. I love Italian food -- each region has its specialties and I would want to sample all of them.
valmg @ From Val's Kitchen
I love the taste and texture of freshly baked bread. We have a bread that looks just like this in the bakery but they call it something else, it's good.
Marisa Franca
A house always smells so good with the scent of bread, doesn't it Val? There are a lot of Italian bread and shapes out there. And whatever the bread's name you can call it good. 🙂
Lauren Vavala
I grew up with grandparents who cooked very traditional italian foods, but don't remember this type of bread! I'm current low carb (sad, I know) but as soon as I can I am going to try this!
Marisa Franca
Hi, Lauren! Well, we can celebrate once you're off your low carb diet -- we'll both eat some bread. ????
Pam Wattenbarger
How neat is it that you found this bread that shares a name with your family. I love when cooking and baking helps you learn more about your origins.
Marisa Franca
Hi, Pam! There are a lot of foods with Pugliese in it -- I should do more in honor of my heritage!
Megan | Strawberry Blondie Kitchen
This bread looks amazing. There is nothing better than a crusty, rustic Italian loaf of bread. I don't bake bread much in my house but if I would, I'd know exactly where to start thanks to you!
Marisa Franca
Hi, Megan! Bread making is really simpler than it seems. The smell is worth the effort. If you have any questions, just ask and I'll try to answer!
Tina
Thank you Marisa. I made it all bread flour because I had the biga made and no local grocers carried the Duram flour near me.
First, let me say, I'm not a baker. I think I've attempted bread-making twice before. The first time my college friends and I shellacked the loaves of Challah bread and used them for doorstops (not joking). They were pretty, but inedible. The other time was blah bread, not worth eating. So now that I'm retired and I can't get decent bread nearby, I thought I'd give making it a try. I lived in Spilimbergo, Italy for 5 years and they have the best bakery in the world there and their specialty is Pugliese bread. You can get plain or Pugliese giallo (yellow). The think the difference is an egg yoke, but I don't know for sure.
So I made the bread today. I tried my best to follow your directions closely. In retrospect, I didn't mash the potatoes enough, there were lumps in the dough (but they were not noticeable in the finished bread). The stretch and fold method was very tricky, especially since my dough was probably too wet. I watched about 10 differed You Tube videos and I guess I did the job adequately, but the loaves were flatter than I think they should have been. I didn't know why I was spritzing the oven and I don't think I did that nearly enough. A friend explained it to me when I complained that my crust wasn't hard enough. She also suggested I throw a few ice cubes in the bottom of the oven for more steam.
The inside of the loaf was very good. It was airy, chewy and flavorful. As I mentioned, the crust wasn't hard enough. Also, I didn't care for the bottom of the loaf being cooked in the spray oil. Could I have just put it on the Semolina? I don't have a baking stone. Also, now that I read your recipe again, it says the back of the sheet pan? I used the sheet pan right side up.
I think it was a pretty big success, even without being perfect. I'll try again next week. Any tips or help would be great.
Thanks
Tina
Marisa Franca
Congratulations, Tina!! Pugliese bread is not a simple bread or the faint of heart. I think it's the wet dough that puts some people off but it is well worth the effort when it does come out delicious, filled with holes, and chewy.
I've had some funny stories to tell about bread baking, too. I'll share them sometime.
Now for some tips and your questions make me see where I can explain further on the recipe.
You can substitute semolina flour for the fancy durum flour, but you use only 1/3 as much and the rest with an equal amount of high-gluten flour or bread flour. You can also use only high-gluten or bread flour BUT the amount of water in the final dough will be determined by the particular type and brand of flour you use. Durum flour tends to absorb more water than bread flour. That's why there is a variation of water in the recipe. Start off with the lowest and adjust as the dough demands.
The mashed potatoes is really an ingredient that adds some flavor to the bread and tenderizes it because of the potato starch. The potatoes would be some that were leftover from a previous meal and had already been seasoned with salt.
Yes, you can put the dough on semolina. The way we do it is on parchment paper and halfway through the baking slip the loaves off the paper and let it finish on the stone. We now also have a baking steel that we LOVE. If you plan on baking a lot of bread I imagine you could find some unglazed tiles you could put in the oven. The stone and steel always stay in our ovens.
The water and the ice your friend recommended is for getting a nice crust. Don't spray the bread, spray the walls of the oven being careful NOT to get it near the light.
How was the color of your bread? Sometimes we have a tendency to take the bread out too soon because we think it's getting too dark. Every oven is different. The bread should be a deep golden brown with an internal temperature of 205 F. in the center. If you see the top of your bread is getting way too brown, tent it with foil and remove it 5 minutes before done. Another trick is when the bread is done, turn off the oven, crack open the oven door and leave the bread in for another 5-10 minutes.
Semolina and durum flour have a tendency to give the crumb more of a yellow tinge.
If you baked your bread on a baking sheet - it doesn't matter if it's on the back or front. We use the baking sheet as a humongous peel to slide our loaves onto the stone. Our loaves are on the parchment paper so the paper slides fairly easily off of the tray.
I hope I've answered your questions. If you have any more please ask away. I love talking dough! ?
Tina
I'm ready to try again. I purchased a baking stone and I have the Duram Flour arriving tomorrow. I have the biga rising now.
The color of the bread was perfect. I would describe it as dark golden, but I know that's the way it should be. I don't have a baking thermometer, but the meat thermometer I stuck in went over 190 very quickly. I figured it was at least 205 and it was, in fact, cooked completely.
What is the crumb?
My husband really loved the bread. I made fantastic French Toast with it the third day. I froze one loaf right away - but I already defrosted it and we ate that up, too. Next time I'll make some garlic bread. It would have gone so perfectly with the Lemon Basil Shrimp Pasta I made tonight (your recipe). It was delicious.
Marisa Franca
Hi, Tina! You've done great! I wrote to your email at length but if someone is curious about the thermometer, and it is instant-read, it will read the temp of the bread. Let us all know how you're getting along! Thank you so much for the updates. It's great hearing from our readers and we appreciate so much!
Tina
Is semolina the same as fancy duram flour? Where do I get fancy duram flour?
Marisa Franca
Hello, Tina. King Arthur flour handles what is called fancy duram flour. It is a fine semolina -- and Caputo which is an Italian imported flour usually calls it 00 flour.
annie@ciaochowbambina
This is incredible!! I need to try this. I need to!!
Marisa Franca
You'll love making it, Annie! Nothing like homemade bread. I could bake every day.
Maria
I already have visions of dunking this bread in my tomato sauce ...which reminds me of the 3 bushels of tomatoes waiting to be transformed this long week-end! Can't wait to try this recipe. Thanks for sharing 🙂
Marisa Franca
Ciao, Maria! You're welcome. It is delicious and I really enjoy making. Let me know how you like the recipe.
Aidy Drayton
Hi Marisa,
I married into an Italian family who originate from the Lazio area... they have a local pagnotta that is large and round in shape and has a thick crust and open crumb.
I have just fitted a Valoriani stone oven in my garden, and have tried making this bread without success.
I would be eternally grateful, if you could recommend a recipe for making this bread, my biggest hurdle has been creating the open crumb texture.
Many thanks
Aidy
Marisa Franca
Ciao Aidy! This recipe is fairly easy to make. If you follow the directions you should be able to duplicate the texture and taste that you want. If you have any questions about any of the directions please let me know and I'll try to explain further. Let me know how it all works out.You might want to try this recipe out in a regular oven and then progress to your stone oven outside. Buon fine settimana.
Diane
Thank you very much (grazie mille)! You may be hearing from me in January! I printed your instructions. Even tho we have the same book, you have success with your recipe, and I didn't have success with the recipe in THE BREAD BAKERS APPRENTICE. So, I'm going with your instructions every step of the way!!
Marisa Franca
Prego Diane! I meant what I said about calling if you have a question. If something doesn't make sense or you have a question just call or text.
Diane
Okay, you've inspired me!! I will try to make bread one more time with a "starter". I've never had any luck making bread with
a "poolish" or a "biga". When I bake bread, I always proof my yeast before I start, and I have success with that. But when using a biga or poolish------my bread never turns out!!! I don't know what I am doing wrong. I also have THE BREAD BAKERS APPRENTICE, and have read it, and studied it, and tried using it when I baked. Unfortunately, my bread looked nothing like yours. But now I have the inspiration to try it again. Once the holidays are over, and January is here, I promise I'm going to try it again. I may email you, every step of the way, but I WILL TRY AGAIN! Wish me luck!
Diane
Marisa Franca
I will be more than happy to help you every step of the way. Make sure your yeast's date hasn't expired and then follow directions. You have my number -- you can use it and it'll be like I'm right there with you 🙂
Wayne Greening
The time to bake does not make sense
Marisa Franca
Hello, Wayne! You preheat the oven to 500℉. You slide the bread onto a baking stone, close the oven door, and after 30 seconds you spray water on the oven walls. This creates steam. Be careful you don't do the light. Close the oven and after 30 seconds you do it again. Then you do it again after another 30 seconds. This gives you a total of 90 seconds. You lower the oven temperature to 450℉. Bake for 15 minutes. Then you ROTATE the bread 180 degrees. A half-turn. This is to make sure that the bread is baking evenly. You continue to bake for another 10 to 15 minutes. The bread should be a nice golden brown and the inside temperature should be 205℉. BEFORE you start cutting into the loaves, let them rest on a cooling rack for at least 40 minutes. I hope this makes sense. If not, let me know. Happy baking! Let us know how you like the bread.