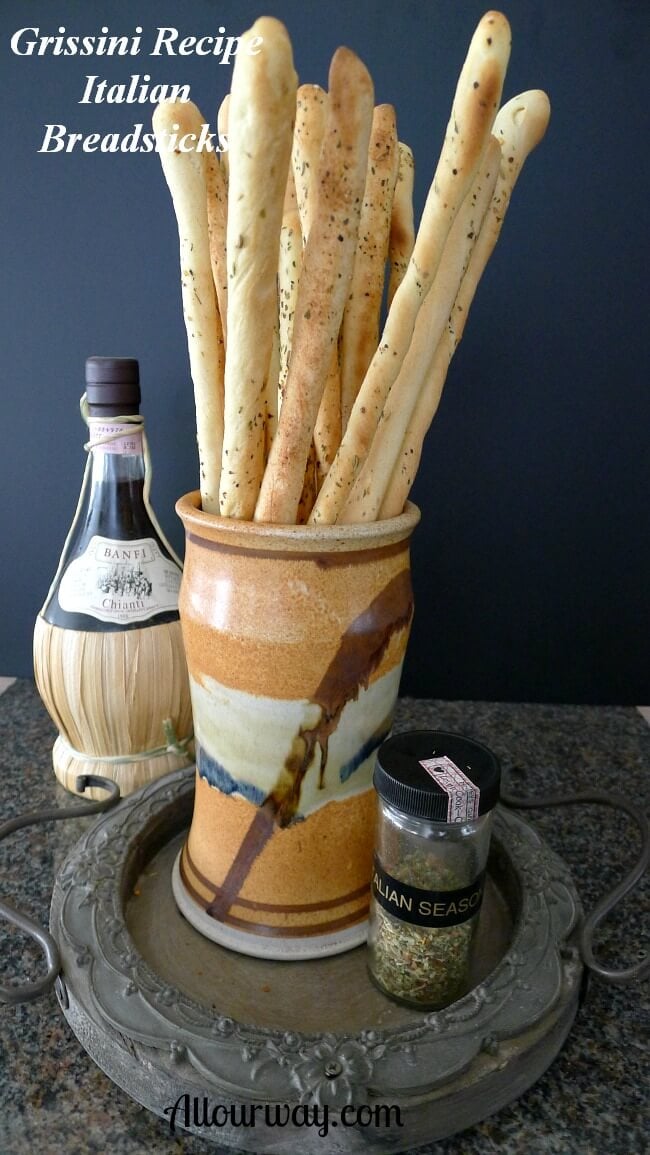
Every long car trip to grandma and grandpa's house included grissini breadsticks - wonderfully crunchy Italian breadsticks. We would no sooner pack the car when we'd make our first stop -- a small Italian community north of us.
The first stop was Barrato's -- an Italian meat market. There we would buy several pounds of Barrato's homemade Genoa hard salami.
Oh that smell!!
Then the next stop would be Fossi's -- an Italian bakery. There we would pick up several round loaves of homemade Italian bread and several sacks of his crunchy grissini breadsticks.
The formula for those wonderful breadsticks was a secret -- he didn't share it with anybody.
For years I tried to duplicate those breadsticks with no success. The grissini breadsticks I made would taste good but they just ended up tasting like long rolls of baked bread.
Mamma and papa loved the treats that we'd bring. They especially loved the salami and breadsticks. Papa liked to dunk his breadsticks in his coffee or his minestra like Pasta e Fazoi.
There was a rule for car trips -- no food was to be eaten until the big highway.
Interstate 74 was about 45 minutes away -- you can imagine the challenge of keeping eager hands away from the food when the car was redolent with the aroma of bread, Italian breadsticks and salami.
Every five minutes, " Are we at the big highway yet?"
Those were the days when you could put the seat down on the station wagon.
Pillows . . . blankies. . . toys . . . books . . . filled the back.
The kids had a virtual playground in the back of the wagon plus they had room for a picnic.
Time flew by. The 4 ½ hours in the car seemed like nothing at all.
There were a lot of crumbs on the blanket in the back but there were still enough grissini breadsticks, salami and bread left to share with grandma and grandpa.
What are grissini?
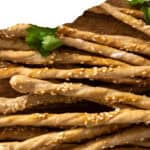
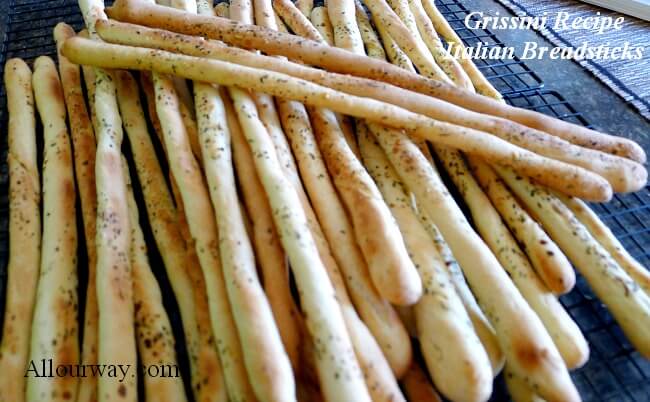
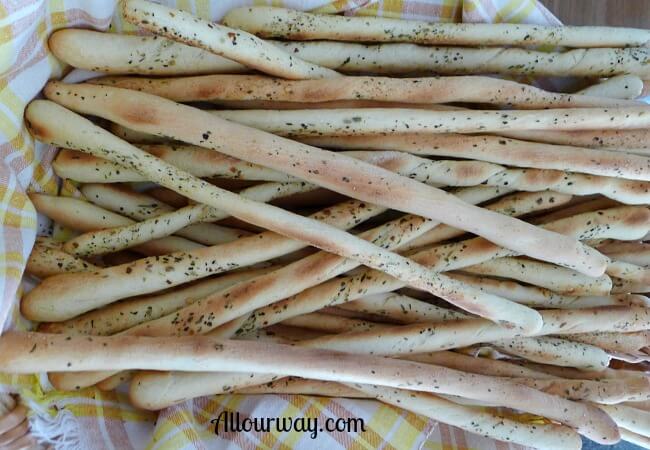
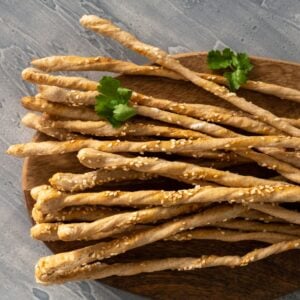
They are simply long thin ropes of crispy, dry bread. The word grissini is the Italian word for breadstick. They are popular in Italian restaurants since they pair well with all types of food.
The origin seems to be in Turin, Italy. Grissino Toriniesi, breadsticks in the style of Turin, are super popular and Turin takes pride in its grissini production.
There are many myths surrounding the origin of this delicious crunchy breadstick. The most plausible one is that a cook had leftover pizza dough and didn't know what to do with it. Rolling out the dough as thin as a pencil and baking it was the idea that won.
Are grissini breadsticks difficult to make?
The recipe for making grissini breadsticks is quite simple -- it's basically a fast bread recipe that you knead and then let rest for 5 minutes.
In this recipe you use two types of flour:
- all-purpose flour.
- semolina flour.
You will also need honey in this recipe although the Italian breadsticks will not be sweet.
How do you prepare the Grissini Breadsticks dough?
The shaping begins with stretching the dough into a 14" x 4" rectangle by pressing the dough down with one hand and then pulling it with the other hand.
If the sides get too wide, don't worry, just scrunch in to keep it an even 4" width. You do this at both ends.
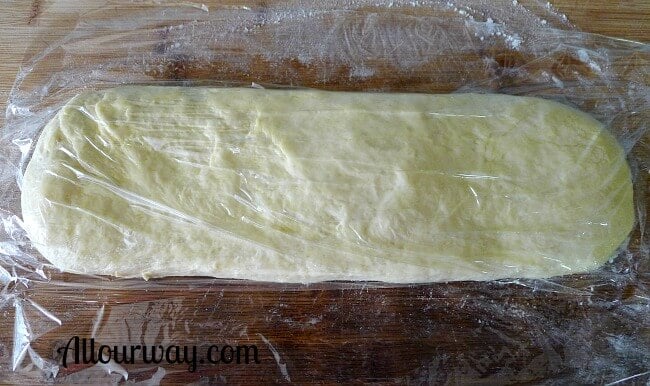
Now, you use your fingers to rub olive oil over the entire surface of the dough. Cover the grissini dough with plastic wrap.
Let the dough proof for 1 hour at room temperature. The dough will get nice and puffy and when you gently press on the dough your finger, it leaves an imprint.
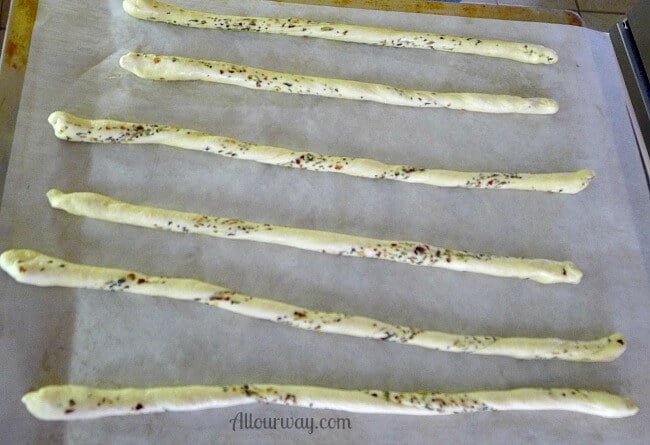
Shaping the Grissini Breadsticks into long ropes.
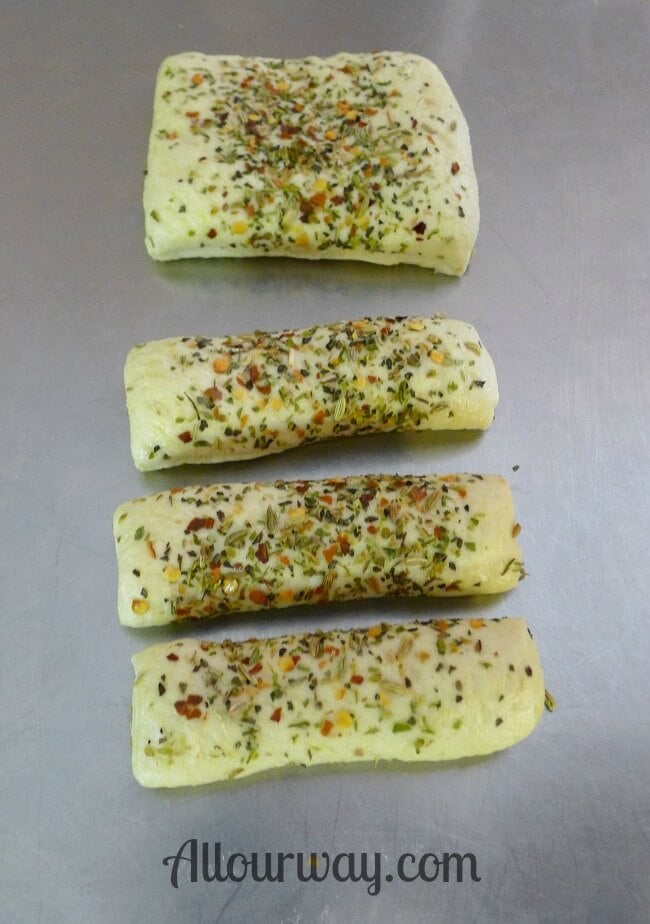
Preheat the oven to 450° F. Again you rub the dough with olive oil and then cut the dough into 4 equal parts.
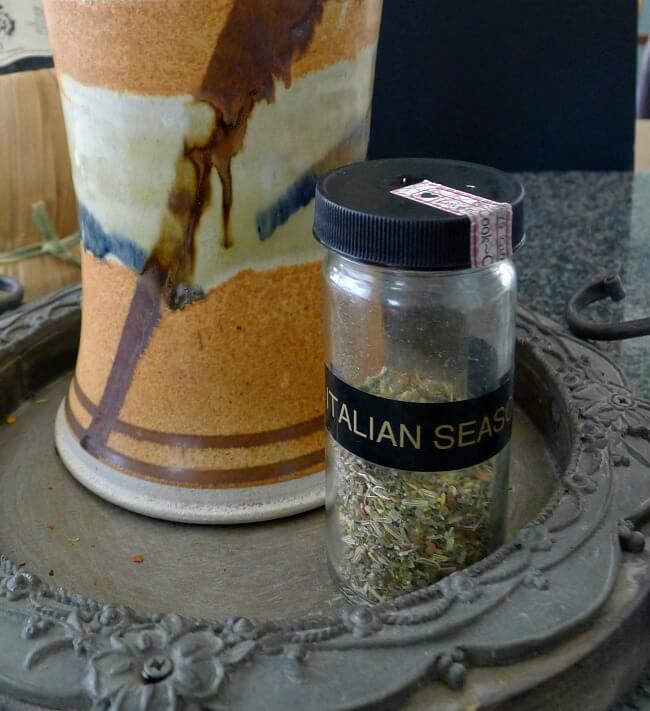
Now is the time to put the Italian Seasoning on the grissini breadsticks. You make the seasoning ahead of time and it has a nice spicy taste without being too hot.
Don't be shy! Liberally sprinkle the seasoning on top of one of the quarters making sure that it covers completely to the edges.
Cut the quarter into 6 strips. The dough is very soft and it is easy to stretch to a 14-16" length. Rub a little bit of olive oil on the work surface. That makes the rolling easier.
Right before you lay the breadsticks on the baking sheet, give the strip a twist.
You do this by placing your palms on the ends of the strip and bringing one hand toward you and the other hand away. This is a push pull motion.
Baking the Italian Breadsticks -- patience my friend.
Don't try to save time by putting two baking sheets in at a time or by crowding the grissini on the sheet - you won't get the desired results.
The trick is rolling and baking just the right amount of dough at a high oven temperature.
Bake for 10-12 minutes turning the sticks at 6 minutes so that they brown evenly.
Uses for Italian breadsticks.
There are a wide range of ways to serve grissini breadsticks.
- A platter of them on the table at an Italian meal or any meal for that matter.
- Use them as appetizers. Roll some prosciutto around them. YUM!
- Eat them plain as a snack.
- Use them as scoopers and dippers ( no double dipping, though).
I wish I would have discovered this crunchy recipe before my parents passed away . . .
. . .I would have made grissini breadsticks for my mamma and papa every week.
Tutti a tavola è pronto!
Un caro saluto e alla prossima.
YOU MAY NEED ...
The following are affiliate links. As An Amazon Associate I earn from qualifying purchases.
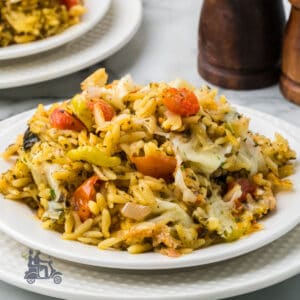
Grissini Breadsticks: Crunchy Italian Breadsticks Recipe
Making homemade breadsticks is not difficult at all. Once you taste the homemade version you will never be satisfied with store bought or what you get in an Italian restaurant. The beauty of this recipe is that you can put whatever topping you like. We give you some ideas at the bottom of the recipe. Let us know how you like the recipe.
Next time you're wanting some special bread and seasoning, make our Two Kinds of Cheesy Garlic Bread recipe. It's so easy to do and your family and friends will praise your ingenuity.
If you like this recipe please give it a 5 star rating. This helps others decide on which recipe to choose.
📖 Recipe
Grissini Breadsticks- Crunchy Italian Breadsticks
Ingredients
- 1 cup warm water 105-115 F
- 1 package 2 ¼ teaspoon active dry yeast ( If you use instant yeast -- just add instant yeast to the dry ingredients )
- ¼ cup olive oil
- 2 ½ cups all-purpose flour
- ½ cup semolina flour
- 2 teaspoon honey
- 2 teaspoon salt
- Topping of choice
Italian Seasoning
- 1 tablespoon dried oregano
- 1 tablespoon dried basil
- 1 tablespoon dried parsley
- 1 tablespoon red pepper flakes
- 1 tablespoon granulated garlic
- 1 ½ teaspoon dried rosemary
- 1 teaspoon fennel seeds
- 1 teaspoon kosher salt
Instructions
- In a large bowl, sprinkle yeast over warm water whisking until dissolved. Let stand 5-10 minutes until foam appears in the center. Now stir in the olive oil -- it won't incorporate but that's okay. Add the honey.
- Whisk together the flours, salt ( instant yeast if you're using it instead of the active dry.)
- Add the dry ingredients to the wet. You can use the stand mixer with the dough hook or you can knead by hand. If kneading by hand you may need to use an additional 2 Tablespoons of flour.
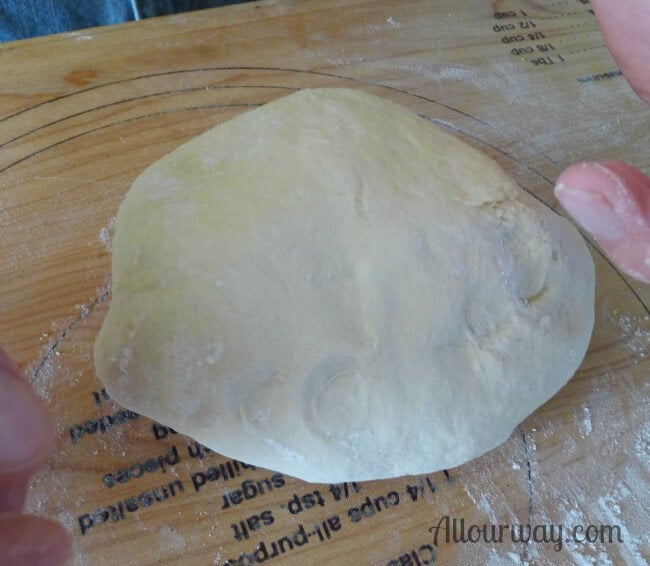
- Continue kneading for 10 minutes - the dough should be smooth. Let the dough rest for 5 minutes.
- Shape and stretch the dough into a 14" x 4" rectangle by pressing dough down with one hand and pulling the end with the other hand. Press and stretch from the other end. Make sure the dough stays at a width of 4". Repeat the process until the dough is 14" in length.
- Brush the dough with olive oil and let it rest on your work surface. Cover the top and sides with plastic wrap. Let the dough proof for 1 hour at room temperature. The dough will be puffy and a finger will leave an imprint when you press into it.
- Preheat oven to 450 F.
- Remove plastic wrap from dough; brush with olive oil again.
- Cut dough into 4 equal parts. Work with one quarter dough at a time, covering remaining dough with plastic wrap.
- Sprinkle with topping of choice -- we chose Italian Seasoning. Make sure the topping covers completely to the edges. Lightly press the topping into the dough.
- Cut the quarter piece into 6 strips.
- Stretch and roll out the dough into 14-16" strips. The dough is very pliable and easy to work with.
- When you reach the proper length twist the strips. You twist the dough by simultaneously rolling one hand forward and one had back.
- Place the strips on a large baking sheet lined with parchment paper.
- Bake 10-12 minutes until light brown. For even browning turn the sticks at 6 minutes.
- Cut and roll the next quarter of dough while these bake.
Italian Seasoning
- Put all the ingredients in a small food processor and pulse several times.
- Use 2 teaspoons of this mix per dough quarter.
Notes
- To get the proper chew you need to bake one pan at a time.
- Instead of the Italian seasoning ,flavor toppings can include: coarse salt and coarse black pepper, or sesame seeds, or Parmesan cheese, or poppy seeds, or sun dried tomato, or fennel seed and salt.
- Adapted from an old Cuisine recipe.
Nutrition
Sign up for the emails and never miss another recipe!!
We'll never share your email or send you spam. PromiseNote: Recipes and content from All Our Way©All Our Way 2014- 2018 are copyright protected. Please do not use content or recipe without prior written permission. If you want to share the information please link to this post. Grazie.


Domenic Popko
Beautiful recipe. Quick, delicious.
Katy Ailstock
Good recipe and great instructions, thanks
Marisa Franca
Hi, Katy! Thank you so much for your comment and rating. So glad you enjoyed the breadsticks. Have a Merry Christmas.xoxo
Maxine Mitchell
I made these today and they aren't that hard, but if you don't use lots of seasoning, they are bland. Also, keep them in the oven longer than 12 minutes or they won't be crispy.
Marisa Franca
Hi, Maxine! Thank you for the tip -- everyone's oven is different and that's why we recommend trying out the lower time. Also - some breadsticks don't have any seasoning at all - we always want you to experiment to your taste. Happy Baking! xoxo
JoJo
Hi there! Attempting to make these today. Yours look amazing. Can you tell me how to store them? Glass or plastic container? Ziploc? Freezer? And how long do they stay fresh? Thank you!
Marisa Franca
Hi JoJo!! We just use freezer plastic bags/containers. Make sure they're really cold by the time you store them. They should stay crispy. We like to freeze things ASAP because we believe they stay fresher tasting. Have fun with the recipe - let me know what you think!!
Dan Lafferty
Great recipe! 5 -1/2 stars!!!!!!!!!!!!!
Marisa Franca
Thank you, Dan!! Happy baking and eating!!
Priscilla
Can’t wait to try these! They sound so authentic healthy and delicious thank u for sharing this wonderful rec
Cecelia
Easy and delicious! We like them with just garlic salt as seasoning! Thank you so much!
Fonda Engle
I grew up in that little town with Fossi's! Their breadsticks were the absolute best! Hoping to replicate! Thanks for sharing your recipe!
Marisa Franca
Hello!!! How wonderful to meet you. Our address was Rosedale but we actually lived in the northernmost part of Terre Haute. My gosh we would get their breadsticks and their round bread. Did you ever buy meet at Barato's? He and his wife made all of thier own sausages and cured meats. One of the counties that Hubby worked with was Vermillion County. He knew LOTS of people there. Please let us know how the breadsticks turn out.
Denay DeGuzman
Homemade breadsticks are the best! The flavorful aroma that fills the kitchen as they come out of the oven is divine. Thank you so much for sharing your Italian breadsticks recipe. They look delicious!
Veena Azmanov
I love breadstick but not made it in ages. These look so good Marisa. My kids would definitely love them. They use to be crazy about breadsticks when they were kids.
Kylee from Kylee Cooks
I LOVE grissini - I always make a beeline for it in Italian restaurants. It never occurred to me to make my own. Can you just move in with me please?
Ruchi
Thank you for detailed tutorial! I was wondering how to make this breadsticks once i tried them at my friends house, so crunchy and delicious!
Tracy
These are SO authentic and so easy to make. My daughter LOVED them so much and had fun with the dough!
Cheese Curd In Paradise
I love crunchy breadsticks! These look like a wonderful snack and perfect for a little savory treat!
Dan Zehr
Very good bread sticks. The kids liked them. This is absolutely fantastic! So YUMMY!
Mahy Elamin
I made the Italian Bread sticks yesterday and they turned out great - very light and fluffy. We had Chicken Tortellini soup with them and it was a fine dinner. Thanks for the recipe - I will definitely make them again.
Gloria
I am such a brad lover. These would be the perfect addition to any meal. Great for appetizers too. I would just eat them as a snack. I think this would be a fun weekend kitchen food experiment. Plus, I would have a glass (or two) of wine while I make them.
Jyothi (Jo)
Those bread sticks look and sound amazing! I'm definitely going to make these soon. My family will love to chew bread stick all the time.
Marisa Franca
They are really a huge hit with the family, Jo. Hope you give it a try.
Tammy
I love homemade breadsticks! We usually make them around the holidays when we're busy baking bread and have leftover dough. These look great..definitely trying it with the semolina flour next time 🙂
Marisa Franca
You won't be disappointed with the semolina, Tammy!
Veena Azmanov
Oh, Marisa. I have not made bread stick since my baby was small. When she was a toddler I would make these every week. Why? lol, she had week gums so the dentist suggested she chew on breadsticks. Of course, the mom in me had to do homemade - This looks so good.
Marisa Franca
Hi, Veena! You'll have to make up another batch.
Valerie
I've never made breadsticks like this. I know I'd enjoy trying them, they remind me of breadsticks that a local restaurant offers.
Marisa Franca
Hi, Valerie! We've eaten lots of different breadsticks and these are our favorite.
tiffani
How long can I store them? Can I make them 2 days before an event? Is it ok to keep them in a ziplock bag after it has been baked and cooled?
Marisa Franca
Hi, Tiffani! Yes, you can make them ahead of time. Keeping them in a ziplock bag after they've been baked and cooled is okay. We like to freeze them and then take them out as needed. Freezing them keeps them fresh tasting. They are a lot better than store-bought or what you get in restaurants.
Noel Lizotte
LOL @ remembering when we could put down the station wagon's back seat. My family made lots of trips from Ohio to Vermont that way! Altho, we usually drove at night so the kids would sleep and not bother dad.
I love Italian bread sticks... so looking forward to trying this recipe.
Claudia Lamascolo
this is exactly the kind of ingredients my grandma used to make hers. I just love your recipes and authentic ways. I must try this, its one I never wrote down Thank you Marisa btw if I had a daughter, that was the name I had picked out, I had to boys so I never got my Marisa 🙂
chef bryan
hi I want to try this recipes but ? can I ask about the exact measurement of the flour? it is 24 cups for 1 cup of water? check the recipe please, thank you,,,,
Marisa Franca
Thank you, Chef Bryan. The slash was missing between the 1 and the 2 for the 1/2. I appreciate you bringing it to my attention. I've corrected it. Please leave a comment and let me know how you like the recipe. Merry Christmas.
Diane P.
I made this grissini recipe last night. They were delicious! And so simple to make! Had I realized how easy they were, I might have tried them sooner. The dough was an absolute "dream". So pliable and easy to work with. I wonder what else one could make with that particular dough.........
Thanks for blogging that recipe. It's a definite "keeper".
Marisa Franca
Thank you for such a sweet reply. I know that we'll be making the breadsticks again and again. Have a wonderful day!!
Paragueros
Thanks for sharing this recipe
Ginnie
I love grissini! Thanks for sharing this recipe. I can't wait to try it:)
Marisa Franca
I'm sure you'll enjoy them -- we can't wait to make a triple batch!
Angie @ Postcards from the Ridge
Those look and sound amazing! I'm definitely going to make these soon. My family will love them. Thanks for the recipe and the story about them.
Marisa Franca
The grandkids loved them as well as our kids. They make a perfect snack.
Milla
Hi and greetings from Finland! Just had to say that these look so tasty I have to try them. Thanks for the recipe!
Marisa Franca
Ciao Milla! I'm so glad you stopped by!! The grissini are fantastic. Please let me know how you like them. Coming up I'm also going to post recipes of our Stud Muffin -- fantastic bread with Gruyere and also our volcano buns.